Since moving to Oxford last year, I have had a problem. I don’t have room for my CD collection. I have over 650 albums on CD, and I simply don’t have room at my house in Oxford to store more than a handful of them. Consequently they are still stored at my parents’ house in Witney.
Fortunately, I had not long before gone through and ripped all of my CDs to OGG/Vorbis files. This was originally so that I could listen to music when out and about. Back in the day I had carried my whole record collection around on my old iRiver DAP and I wanted to do the same with my phone. But this also meant that I didn’t necessarily have to take all my CDs with me to be able to listen to music at home.
I first tried connecting up an iRiver H-140 that I had bought on eBay to the back of my hi-fi. This wasn’t terrible, but was an awkward and fiddly solution. Although it was handy and easy to use as a portable player, it proved more awkward to operate while it was sitting on top of the hifi. The next option was to hook up a Bluetooth receiver to the hi-fi and stream audio to it from the phone. This was easier to control but could occasionally be glitchy and there was some loss of sound quality. I also wasn’t happy with my phone being the primary place from which my music was playing. I preferred to keep my home audio set-up independent and self-contained, although being able to control it remotely from the phone did appeal. What I needed was something that could play audio files directly, either stored on the device or possibly from some local network storage, and which could be controlled remotely from, at the very least, anywhere in the same room.
Since the first Rasperry Pi came out in 2012, I have been interested in getting one. However, for a long time, I held off from doing so as I didn’t really have any use for one. Now, however, I did. A quick web search revealed that there were already several RPi music player projects available, so it wouldn’t even be particularly challenging to set one up; mostly it would just be a case of buying a Pi and installing some pre-built software. Of all the projects out there, the one that looked the most polished was RuneAudio, so I decided to go with that.
At this stage the Raspberry Pi 3 had not yet been released and I was unaware that it was just around the corner, so I blithely went ahead and ordered a RPi 2. The built-in audio on the Pi reportedly isn’t great, so I also got a dedicated DAC add-on board. There are several of these available; I went with a Pi-DAC+ from IQaudIO. I picked this particular board for two reasons: firstly, because it included dedicated headers for a volume control and IR receiver, and secondly, because IQaudIO also sell a neat case that would fit the complete setup. In addition to the basic Pi, DAC board and case, I also needed a power supply, SD card (for the OS), USB WiFi adaptor, IR Sensor and USB flash drive (to store music on).
Once all the components had arrived, assembly was pretty straightforward; mostly just a case of screwing things together. The only vaguely challenging part was adding the IR sensor, which did require some soldering. Since I had gone for a transparent case, I soldered the sensor directly onto the board; it should be able to pick up the signal from a remote control through the case.
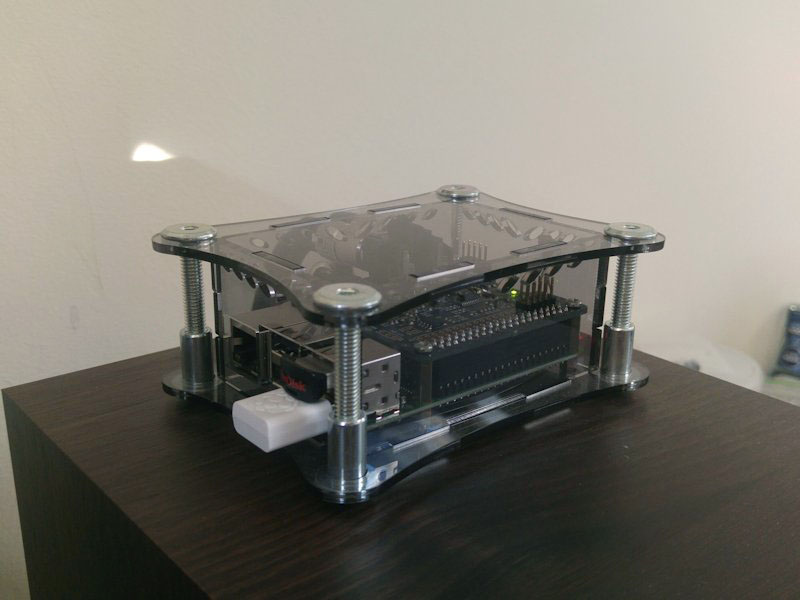
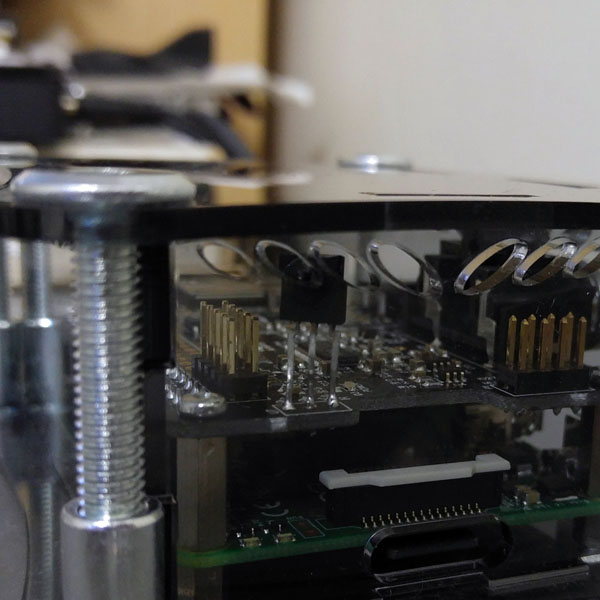 (Click for larger images)
Getting RuneAudio set up and running was almost as painless. One thing that the documentation on the RuneAudio website doesn’t mention is that the install image is quite outdated. There are several bugs in this version that are fixed in more recent builds. Fortunately, updating the system isn’t particularly complicated and can be done through the web UI.
Initially, the system needs an Ethernet connection to be able to log in and configure it. As part of the initial set-up it can be linked to a Wi-Fi network and thereafter there is no need for the wired connection.
Once up and running, the Pi is controlled via a web interface, accessible on the local network at http://runeaudio/. Or, at least, it’s supposed to be. In practice, devices connected to the network via Ethernet can see it fine at that address, but Wi-Fi devices (such as my phone) can’t; they can only find it by pointing directly at the device’s IP address. I think this may be an oddity of our router rather than with RuneAudio as such, but I am not certain. Obviously, this is not an insurmountable problem. I could configure the router to give the Pi a static IP address (I am considering doing this anyway) and then bookmarking this address on my phone. But fortunately this isn’t necessary, as there is a RuneAudio Android app, which automatically scans the network for RuneAudio devices and also acts as a wrapper for the web interface.
So with the Pi hooked up to my hi-fi I now have a player containing my entire music collection, controlled remotely through either my computer or my phone. All that remains is to add support for an IR remote control. This isn’t essential, but for basic controls like play/pause and skipping forward and back, being able to just pick up a remote and press a button would be quicker and easier than having to go to the computer, open a browser and click on a button, or to unlock my phone, open the RuneAudio app and tap the control. Unfortunately, this isn’t likely to be as trivially easy as the rest of the set-up. I will need to install some additional software, and then manually configure it, capturing the individual codes sent by the specific remote that I am trying to use and then mapping them to the appropriate controls for the music player software. It doesn’t look hugely difficult, but it does look fiddly and potentially time-consuming. So I haven’t got around to it yet.
In the meantime, I already have a player that works as well as or better than every other option that I’ve tried, and which I’m pretty happy with.